Keyboard Shortcuts
Keyboard Shortcuts allow to quickly access certain features or actions in the POS application by using shortcut keys or keys combinations.
How to configure:
To enable or disable the functionality, use the CCC service
Supported Features
Register with quantity
The "Register with quantity" keyboard shortcut provides a fast way to register items with a specified quantity multiplier.
When enabled, the POS interface displays the current multiplier in the Numpad Display.
To apply the multiplier, enter the desired quantity and press the asterisk (*) key. The POS will register the next item with the specified quantity.
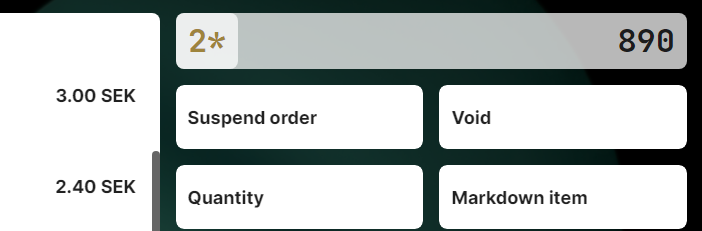
Once an item is successfully registered, the multiplier automatically resets to its default value.
Maximum quantity multiplier: 999
Key bindings
The Checkout App supports customizable key bindings to trigger various actions in the POS application. These keyboard shortcuts can be configured using the keyboardShortcuts configuration.
Available key bindings
The following key bindings can be configured:
lock- Opens the lock confirmation dialogprimaryPaymentMethod- Activates the primary (highlighted) payment method in the payment menusecondaryPaymentMethod- Activates the secondary payment methodopenPLU- Opens the PLU screen (requires PLU to be enabled)openCustomerOrderSearch- Opens the customer order search screen (requires Customer Order Search to be enabled)openTransactionsSearch- Opens the transactions search screen (requires Transactions Search Shortcut to be enabled)openWebBrowser- Opens the embedded web browser (requires External Links to be enabled)openVariantSearch- Opens the variant search screen (requires Variant Search to be enabled)openRescans- Opens the rescans screen (requires SSLP to be enabled)openItemSearch- Opens the item search screenaddItem- Adds specific items by barcode when the configured key binding is pressed
Key binding properties
Reserved Keys: The application reserves Escape (close prompts/dialogs/sidebar) and Enter (submit forms/confirm dialogs) for core UI interactions. Avoid overriding accessibility navigation keys (Tab, Shift+Tab, arrow keys, page buttons) and screen reader shortcuts to maintain WCAG compliance.
Each key binding is defined with the following properties:
keyCode- The key code or character that will trigger the action (e.g., "F2", "L")
Note: The
keyCodeproperty should be a valid Chromium code value for KeyboardEvent or key property. For non-US keyboard layouts or custom keyboards, use the key property. You can find the list of available codes in the MDN Keyboard Event Code Values documentation.
altKey- (Optional) Whether the Alt key must be pressed (default: false)ctrlKey- (Optional) Whether the Control key must be pressed (default: false)shiftKey- (Optional) Whether the Shift key must be pressed (default: false)metaKey- (Optional) Whether the Meta/Command key must be pressed (default: false)
Example
Here's an example of how to configure key bindings:
"keyBindings": {
  "lock": {
    "keyCode": "L",
    "ctrlKey": true
  },
  "openPLU": {
    "keyCode": "F2"
  },
  "addItem": {
    "barcode1": {
      "keyCode": "b",
      "ctrlKey": true,
      "shiftKey": true
    },
    "barcode2": {
      "keyCode": "p",
      "ctrlKey": true,
      "shiftKey": true
    }
  }
}
In this example:
- Ctrl+L opens the lock confirmation dialog
- F2 opens the PLU screen
- Ctrl+Shift+b adds the item with barcode "barcode1"
- Ctrl+Shift+p adds the item with barcode "barcode2"
For complete configuration instructions, see the Keyboard Shortcuts configuration section.